
FIRST LAUNCH.
FIRST PROGRESS.
Your complete COC Bot setup guide. Prepare your emulator, connect an account, choose your routine and build from there.
Updated · Matches the official Discord getting-started instructions.
1. Start with the right setup
Follow this guide from your first installation to a working farming session. Set up one account first, then expand.
- PC: Windows 10 or 11, an internet connection and enough resources for your chosen emulator.
- Supported emulators: MuMu Player Android 15, LDPlayer 9 and LDPlayer 14. Install the supported version from the vendor’s official website.
- Install Clash of Clans inside the emulator. You will also need a COC Bot license; the official Discord offers current plans and a one-day-per-week free tier.
- No coding or developer-tool installation is required. Bot and emulator performance depend on your PC, settings and account count.
2. Optimize emulator performance
- Open Task Manager → Performance → CPU and check Virtualization.
- If disabled, use your PC manufacturer’s BIOS/UEFI instructions to enable Intel VT-x / Intel Virtualization Technology or AMD-V / SVM. Save changes and restart.
- Hyper-V is version-dependent. Current LDPlayer releases support Hyper-V; compatibility still depends on the exact emulator build.
- Keep Windows security defaults. If the emulator reports a conflict, consult its current version-specific guidance before changing Windows features.
- Changing Hyper-V or related virtualization features can affect WSL2, Docker, Windows Sandbox and other virtual machines. Disabling Memory integrity reduces a Windows security protection.
- Start with the emulator’s recommended resource settings. Add accounts gradually; no single CPU/RAM allocation fits every PC.
3. Prepare the emulator and game
- Set the emulator’s display to 1600 × 900 and 240 DPI. These are emulator settings, not Windows desktop scaling.
- Use standard NAT networking. Apply the settings and restart the emulator if requested.
- Install Clash of Clans from the Play Store, sign into the intended account, finish any tutorial or startup prompts, and open your village.
- In Clash of Clans, open Settings → Language → English.
- Keep the intended emulator running and the village ready before connecting it to COC Bot. Repeat these requirements for every account’s instance.
4. Download and install COC Bot
- Download the official Windows MSI, version 2026.5.2.10, from the installer link below.
- Run the installer and finish setup.
- Launch COC Bot by Raboy.
- Use the official installer link below. The website’s Download page also provides the published checksum and release notes.
- If Windows or your security software blocks installation, verify the file’s official source and ask support for help. Do not disable antivirus to install it.
5. Link and activate your PC
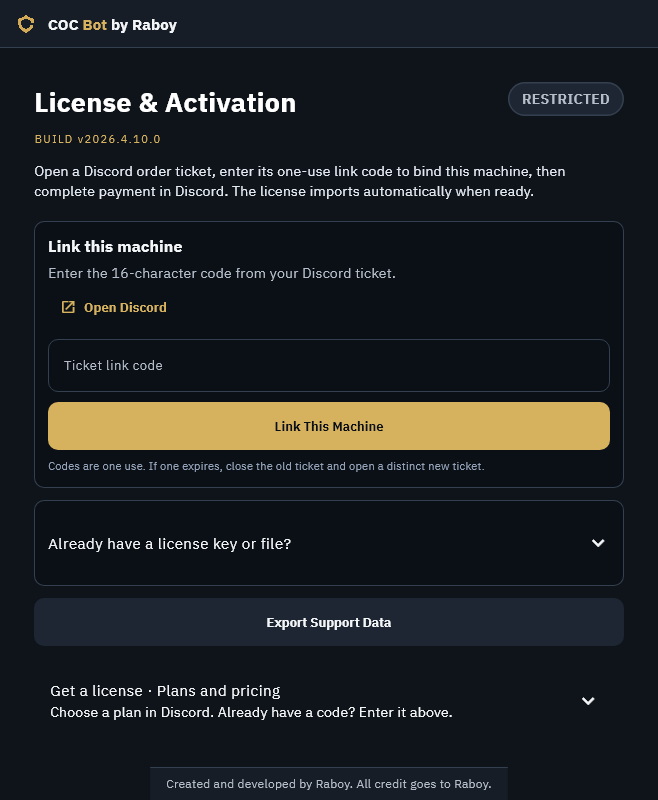
- Open a private order ticket and choose a plan through the ticket’s plan selector.
- Open COC Bot on the PC you want to license. Paste the latest 16-character code into Ticket link code, then select Link This Machine once.
- Follow the private ticket’s payment instructions; the free tier skips payment. Keep the client open while your license is issued.
- Codes are one-use and only the latest code works. If the newest code is invalid or expired, follow the ticket instructions to close the old ticket and open a new order ticket.
- Already licensed? Expand Already have a license key or file?, then paste your key and select Activate, or choose Import License File.
- Keep ticket codes, license keys and payment information private.
6. Create a profile and connect
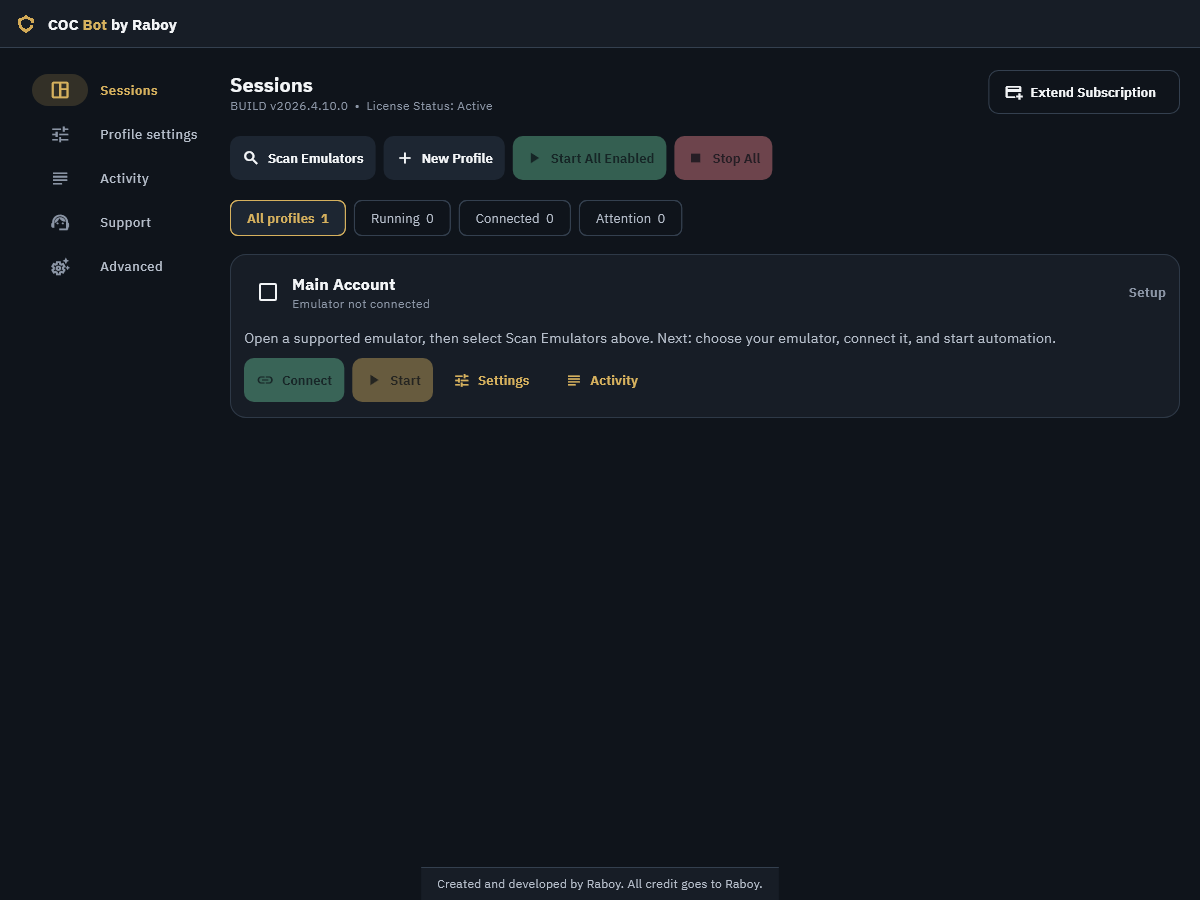
- Open Sessions. Use an existing profile or select New Profile.
- Select Scan Emulators, choose the intended instance from Emulator, then select Connect.
- Wait for the profile card to show Ready. Open that card’s Settings.
- Check Selected profile before editing. The pencil beside it opens Edit profile name and mode: set Profile Label and choose Farm or Ranked as Bot Mode.
- Start with Farm for your first routine. A Profile Label only names the profile locally; it does not rename your game account.
7. Choose farming targets and your army
- Loot targets: In Farming → Farm Thresholds, enable the Gold, Elixir and Dark Elixir targets you want to use.
- Any or all: Trigger attack when any checked threshold is met — ON accepts one enabled target; OFF requires all enabled targets.
- Example only: with Gold and Elixir both set to 800,000, “any” accepts either target; “all” waits for both. Choose targets that fit your village, since strict targets can increase searching.
- Optional controls: Ignore thresholds for full resources skips full-storage targets. Early Surrender has separate Farm/Ranked controls. Ranked mode also has an attack limit and an option to continue farming afterward.
- Army: Prepare your army in Clash of Clans, then review Units → Troops, Heroes, Spells and Builder Base Troops. Check entries to deploy; unchecked entries are skipped.
- Order and requests: Drag entries or use up/down controls. Randomize varies enabled order. Auto request troops before attacks requests Clan Castle support; it does not configure your army.
8. Set up walls, buildings and research
- Open Upgrades. Main Village Upgrades and Builder Base Upgrades are configured separately.
- For a wall-focused routine, turn on Enable Wall Upgrade and select Walls under Upgrade priority. Batched wall upgrades handle affordable groups together.
- Use Automatic resource threshold, or turn it off and enter a Custom resource threshold.
- Choose Enable Laboratory Upgrade, Enable Building Upgrade and Enable Hero Upgrade only for the tasks you want.
- Walls priority reserves the final free Builder for walls; additional Builders can work on other enabled categories.
- Leave Upgrade Town Hall / Upgrade Builder Hall off unless you intend to advance. These controls appear with the relevant building-upgrade settings.
- Upgrades need an eligible target, enough resources and a free builder or lab where required. Progress time varies with your village and run time.
9. Add a Builder Base routine
- Enable: Farming → Farm builder base. Choose Builder Base Troops in Units and the separate upgrade choices in Upgrades.
- The bot checks Builder Base at the beginning of a profile run and roughly every 24 hours of total uptime. A check due during rest waits for the next work cycle.
- It farms while an eligible Builder Star Bonus remains, handles both battle stages where available, then returns to Main Village.
- Star Jars: Use Builder Star Jars consumes available items. Enable it only if you want those items used.
10. Save your routine and start
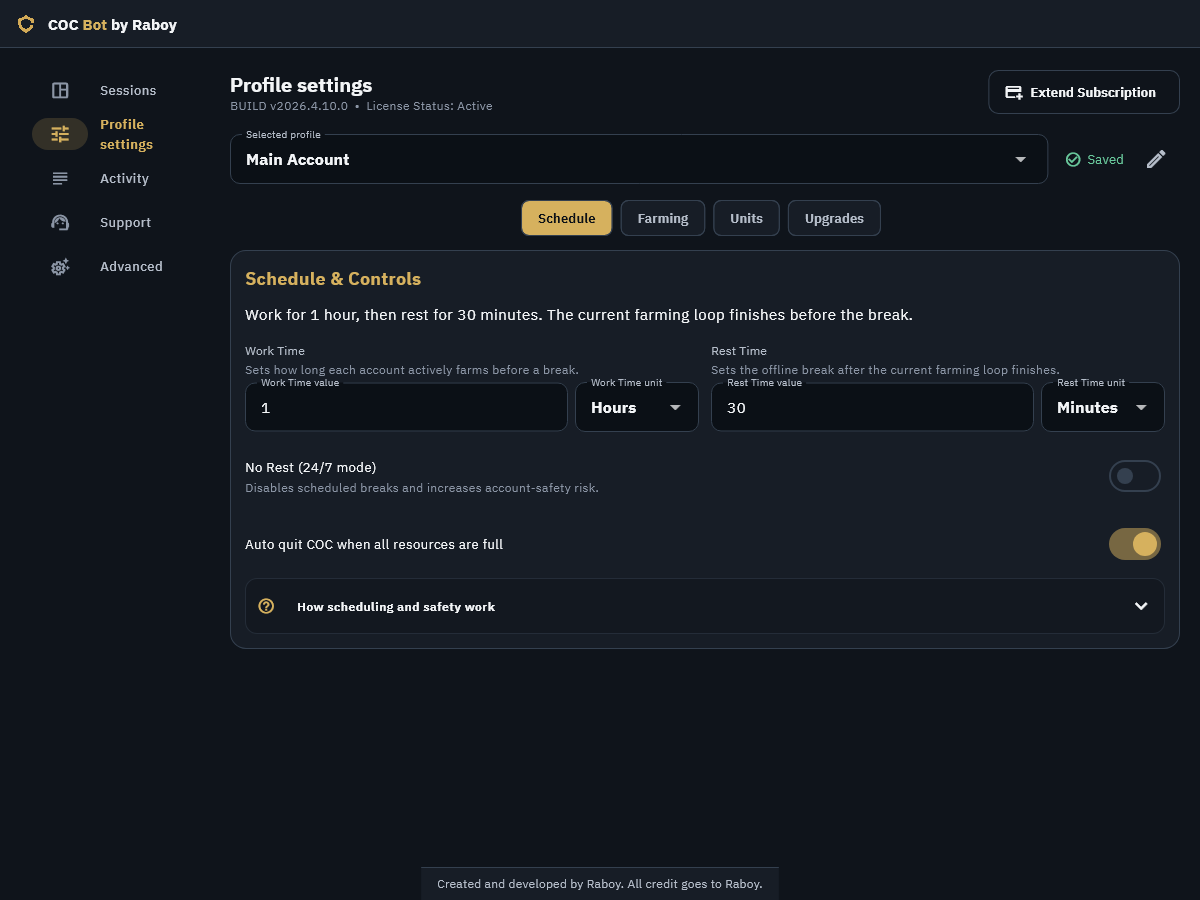
- In Schedule → Schedule & Controls, choose Work Time and Rest Time in minutes or hours.
- Valid changes save automatically. Wait for Saved and resolve Failed — Retry before continuing.
- Return to Sessions. Confirm the profile is enabled, connected and Ready, then select Start.
- Watch the first search, attack, return and chosen upgrades. Activity shows progress.
- Changes apply on the next start. Stop and start a running profile to apply edits.
- Work ends at a farming-loop boundary; resting may not start at the exact second. No Rest (24/7 mode) skips breaks. Auto quit COC when all resources are full is optional.
- Stop ends automation. Disconnect detaches the emulator and stops a running session.
11. Expand to multiple accounts
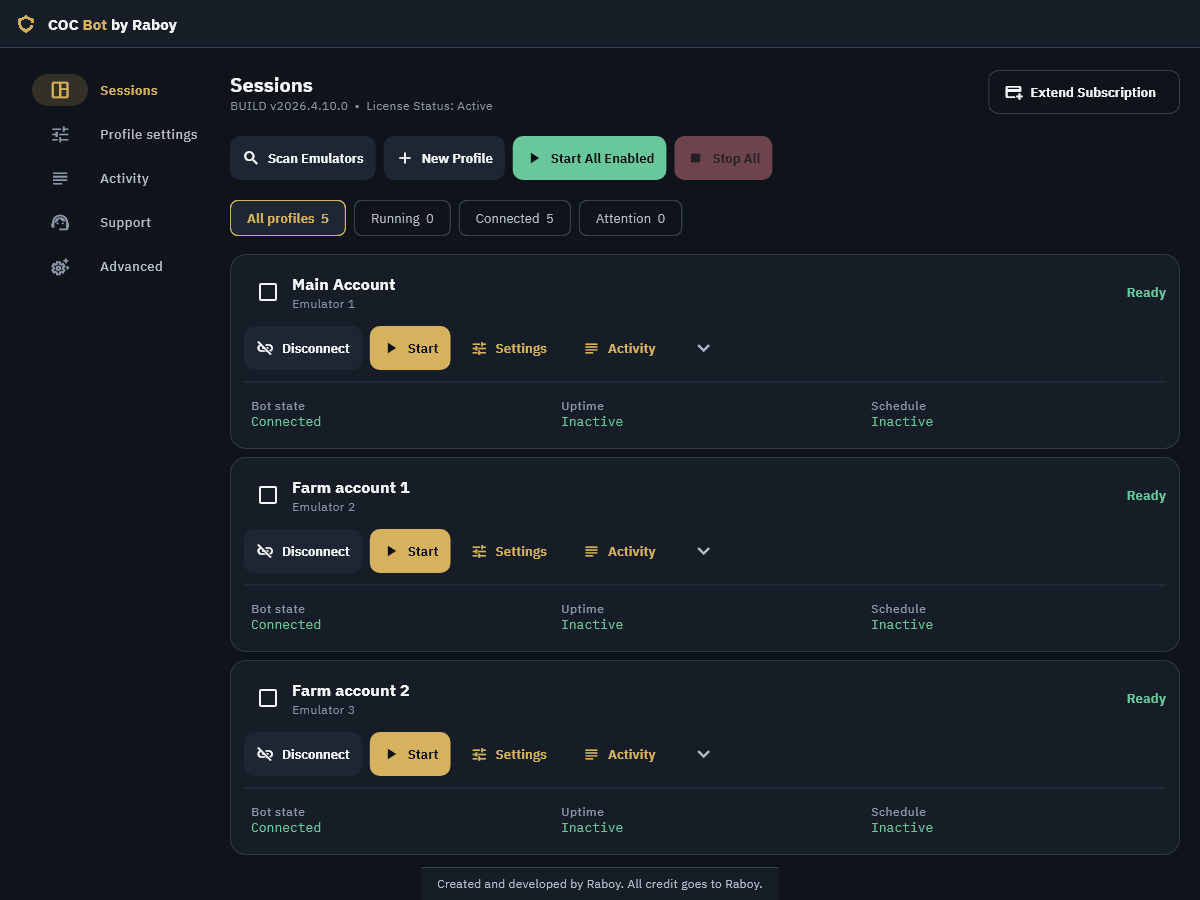
- Create a separate emulator instance and bot profile for each account. Apply English, 1600 × 900, 240 DPI and NAT to every instance.
- Scan, select, connect, name and configure each profile independently. Do not assign one emulator to two profiles.
- Verify accounts individually before selecting Start All Enabled. Use Enable / Disable to choose which profiles participate.
- Use All profiles, Running, Connected and Attention to find sessions. Stop All stops automation while leaving connections available.
- Increase account count gradually while checking Windows CPU/RAM usage and emulator stability. Practical capacity depends on your hardware and emulator workload.
12. Keep the client current
- Select the header’s Check for updates control.
- Choose Download update and wait for verification.
- Select Restart to update when you are ready to stop sessions.
- Optional downloads can Continue in background. Restarting closes the client and stops sessions, so pick an appropriate moment.
- Regular releases bring compatibility fixes, new feature support and improvements. Some older versions may require an update before you continue.
- If an emulator version is reported as unsupported, check the bot’s current requirements and release notes rather than forcing it to connect.
13. Troubleshoot and get support
- No emulator listed: Confirm a supported emulator/Android version, start the instance, wait for boot and select Scan Emulators again.
- Connection fails: Check resolution, DPI, English, NAT, game readiness and compatibility messages. Restart the instance, then scan and reconnect.
- Start disabled: Check that the profile is enabled, its emulator is connected and the license is active.
- Still searching: Review loot targets and any/all logic. Upgrades idle: Check village toggles, resources, builder/lab availability and priority.
- Settings unchanged: Confirm Saved, then restart the profile. Rest periods and a return from Builder Base can be expected behavior.
- For a failure, open Activity and inspect Error / Warning. Provide the bot version, emulator and version, Windows version, steps to reproduce, and the readable error or screenshot.
- If requested, select Support → Export Support Data. Review the ZIP in Downloads and share it in a private support ticket. Exclude passwords, ticket codes, license keys and unrelated files.
YOUR ROUTINE.
READY TO GO.
Install the client or see the controls in action.